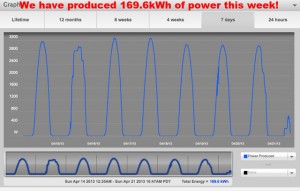
PV Solar, save money and help the planet! Earth Day April 22 2013
The politicians of the world will not save the planet, WE will thru our individual actions. We need to stop blaming the politicians and take care of the problem ourselves and we CAN make a big difference. Lets talk solar energy by starting with the myths about photovoltaic (PV) solar:
1) Myth: Solar is too expensive. Its NOT. The prices have dropped so dramatically that you can now get a panel that makes 240 watts of power for about $300 making it very cost competitive with other sources.
2) Myth: Solar takes too long to pay for itself. Maybe in the old days it did but these days, even without tax incentives and credits, it still makes economic sense – especially if you do the installation yourself. Because the cost of the panels and inverters has dropped so dramatically, the major portion of the system cost is now labor so DIY makes a LOT of sense. Last earth day I installed 4000W of solar panels which cost $12000 but they save us $2000 a year in energy costs and a federal 30% tax credit brings the cost down to $8400 so in 4 years the panels will have paid for themselves and for the 21 years after that, they will be providing free power. An $8400 investment pays $2000 per year, thats a 24% return on investment, you cant do that good on Wall street!
3) Myth: Panels take too much energy to make. If you look at the studies that have been done, it takes about 2 years for a panel to be energy even, that is, it takes 2 years to make enough power to build another panel. After year 2 and for the rest of the life of the panel (typically 25 years or more), the panel provides free energy with no emissions.
4) Myth: Building solar panels damages the environment. Well yes, all forms of energy production harm the environment, not just solar. Three mile island, Chernobyl, and Fukushima have all exploded and let huge amounuts of radioactive materials into the environment as well as having produced million of tons of radioactive waste that has yet to find a permanent home. Petroleum energy is certainly not clean either. Coal strip mining has destroyed thousands of square miles of wilderness and oils spills, drilling accidents have polluted thousands of miles of ocean coastline. Honestly, I think solar is a lot cleaner than any of these. The semiconductor manufacturing process does use some nasty stuff but at least in the USA, the EPA keeps it to a minimum.
Before we go into how you can install your own solar panels, lets look at an option that is a lot more inviting to many who dont have the money, time, or ability to install their own solar PV panels. There are companies like solarcity.com that will install as many solar panels on your roof for FREE, of course there is a catch. You have to agree to buy power from them for a long time to make their investment worthwhile. If you move, the next owners are bound to the same contract. The electic rate is typically set lower than your current rate so that you save money from the very first day without spending a dime. You save money and help reduce greenhouse gasses at the same time, all without spending a dime. All you do is ‘loan’ them your rooftop to install their panels. With one single phone call, you can drastically lower your carbon footprint and save money at the same time! Of course, to do this you need to own the home. If you rent, tell your landlord about this and ask if they are interested!
To us, it was clear that the solar panels were such a good investment that we HAD to buy them. Energy costs only go up and we are now completely isolated from the price increases. Lets talk about self install, as I mentioned its mush easier to self-install solar PV panels than it seems. I you are handy around the house you can do this all by yourself, lets step thru the process
Installing Your Own Solar PV Panels
Step 1: Visit your cities building inspection office
First stop is your city office to pick up a copy of the buidling codes for solar panels, typically they have a pamphlet describing exactly what you need to get a permit. Dont be tempted to do this without a permit. Contrary to what some bad contractors would have you believe, its very easy to get permits and pass inspections IF you build safely. Contrary to most laws, the building codes are actually straight forward and make sense. Building codes are there for YOUR safety and the safety of others. If you make sure your installation is safe, you will pass – period. There are four common sense things you want to avoid:
1) Electroction of you or utility personnal
2) Fires
3) Structural collapse of your house
4) Wind damage
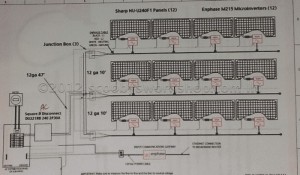
The pamplet will most likely outline all the things that are required to prevent all of the above. Before you worry too much, the manufacturers of solar products do 95% of the hard work for you! They provide you with the tools to specify a bill of materials for your system and provide you with the wiring diagrams that the building deparment will require to issue the permits.
Step 2: Choose your inverter
Seems like a rather odd thing to do but it is the logical first choice. You cant really mix and match purchases, everything must be 100% compatible with everything else. As you proceed down your decision path, fewer and fewer options are available. The last thing you want to do is spend hours drawing plans and that you have to redo everything because the panels you choose are not compatible with the racks so you have to get different sized panels. If you make the decisions in the order I suggest here it will minimize wasted effort and minimize your cost. The type of inverter is the biggest decision you will make, there are two types the shared inverter and the micro-inverters. With micro-inverters there is an inverter which converts the low voltage DC to 240VAC on each and every panel. With a shared inverter, its just one big honking inverter that takes the DC voltage from all the panels and converts that to 240VAC. There is a cost advantage to using a shared inverter but thats the only advantage of the shared inverter. The micro-inverters have the following advantages:
1) no single point of failure, each panel is its own independent generation facility
2) shade blocking one panel does not affect others
3) ease of expanding solar array at a later date
4) easy to monitor and diagnose.
I used the Enphase micro-inverters and found it to be the most amazing, highest quality, well engineered system I have ever used. The entire system is like a lego set, everything just plugs together. The pre-wired cables plug into the pre-wired micro-inverters which just snap onto the panels. The only wiring is in taking the 240VAC down to your houses power panel and if you are not comfortable with that, you can hire an electicion to do that little piece. One caution is that there are at least three different type of connectors provided on solar panels and none of them are compatible. When you order your micro-inverters you need to make sure that you order the connector type that your solar panels use!
Step 3: Choose your panels
The old days of the poly-crystaline panels being inferior to the mono-crystaline panels is gone in my opinion, its just a matter of price per watt, quality, and the reputation of the manufacturer. Choose the size (watts) of the panels you want then go price shopping. Remember that panels are very heavy so shipping costs can add up, make sure to factor in shipping costs when you are making buying decisions. We bought from infinigi.com and found them to have amazing customer service but I’m sure there are many other reliable companies out there. We paid about $320 for each of our 240 watt panels.
Step 4: Choose your racking system
Some might be tempted to build their own mounts, dont! Not only will it be a lot of work but it wont save you money in the end and you wont pass inspection. The racking systems save you incredible amouts of time because of the way that everything bolts together so easily and quickly. The great thing is that the manufacturers have online tools that tell you everything you need to buy. The last thing you want to do is be up on the roof with your two tons of panels only to find that the panel hold down brackets are for panels thinner than yours! I used the
http://unirac.com/residential/residential-products/solar-mount-residential
They have an online tool where you design your whole system based upon your model of solar panel and it gives you a complete parts list as well as the pages of structural calculations that the building deparments want to see for your permits.
Step 5: Now complete your building permit package
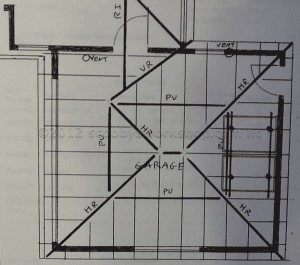
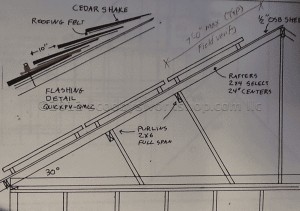
Now that you have all the system components specified, go ahead and complete your package for the building permit and place your order for your system. Dont be intimidated by this package. When they ask for drawings, they dont need to be done by an architecht – you can do them! Just make sure they are to scale and have all the necessary information.
Installing Your Panels
Believe it or not, the hardest part of the project is over before you go up on the roof! Understanding the right things to order and how things plug into each other is the hardest part, the actual installation is quite easy by comparison!
Solar Panel Installation, step 1: Layout lines
Measure and snap chalk lines in the positions where you will be installing the rails. Rails are the structural memebers that the solar panels clamp to. You will have determined the location of these when you drew your plans.
Solar Panel Installation, step 2: Install mounting feet
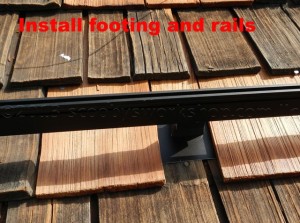
The rails are attached to the house by mounting feet. Depending on the type of roof you have, you might need some fancy feet with flashing. If you have a traditional composition roof, they are cheap and easy. In any case, the hardest part is in insuring that the large, strong, lag screw provided with the foot goes right in the middle of the roof rafter. This lag screw is what is going to keep your panels from flying off the roof in that thunderstorm and it can only do this if its firmly in the wood. I actually found it easier to get into the attic and drill upward, that way I was 100% sure of getting the hole precisely in the right place.
Solar Panel Installation, step 3: Bolt rails to feet
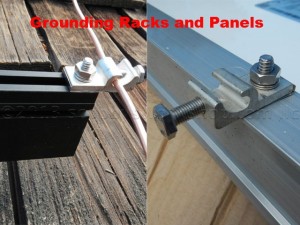
This is really easy if you have purchased a racking sytem like the Solarmount I used. It literally bolts on in 10 minutes.
Solar Panel Installation, step 4:Install micro-inverters and cabling
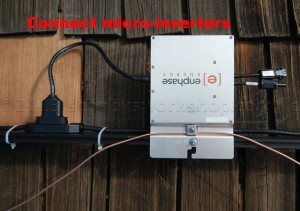
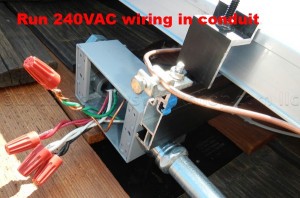
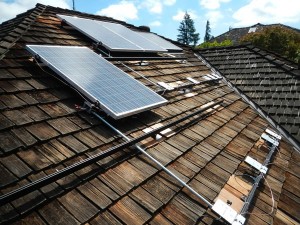
For most, this is the hardest part of the whole process. If you buy the Enphase system, everything snaps together easily, just follow the instructions. The work comes in connecting all the 240VAC wiring and running it down to the disconnect switch you will install next to your power meter. 240VAC wiring needs to be in metal conduit and connections made in waterproof boxes. Typically an installation will have several rows of panels so the conduit needs to connect each row to the next and then run to the disconnect switch. Installing the conduit and pulling the wires is straight forward but its a fair amount of hard, physical labor in rather uncomfortable locations. You can pay to have this done or do it yourself. Typically, the worst run is from the disconnect switch at your power meter to the first row of panels because this run is long and typically goes thru your hot and cramped attic. At this point, you will probably be required to have your first city inspection. Remember the inspector is not your enemy, they are your free expert advisor who will make sure that everything is done safely. Feel free to ask their advice if you are not sure about anything.
Solar Panel Installation, step 5: Clamping panels to rails
This is surprisingly anti-climatic but it is a two person job. Attempting doing this by yourself could easily end with your $350 panel slding down the roof and shattering on the patio below. To install the panels, just snap the connector on the solar panels into the connectors on the microinverter and bolt the panel down – takes at most 5 minutes per panel.
Solar Panel Installation, step 6: Get final inspections
Before you can flip that switch and start making power, you typically need two separate inspections. The first is your final city inspection, the second is from your local utility. Your utility company usually will need to install a special elecrtic meter which lets you sell power back to them and this takes awhile to get scheduled so get the paperwork started at least a month ahead of time.

