
Leg Exercises

- Quad dominant exercises
- Hamstring dominant exercises
- Calves
Everybody wants a big chest and arms, you don’t have to nag people to do bench press or biceps curls. Many people though neglect legs thinking that they can just wear long pants their whole life long but that’s a BBIIIIIIIIIG mistake. Leg strength is very important for all sports and there are few sports where upper body strength is more important than lower body. More importantly though, leg strength is critical for basic health and keeping yourself injury free. If you have strong legs you can lift heavy objects properly and avoid lower back injury.
Quad Dominant Exercises
Goblet Chair Squats
Here is a great exercise you can do at home to work out your legs, its the Goblet Chair Squat or GCS for short. All you need is a used set of dumbbells and a footstool. Its a good idea to make sure your core is strong before starting any sort of squat to help prevent back pain or back injuries. I strongly recommend you do my rotisserie core workout for a few months before starting squats. There are just four simple things you need to keep in mind when you do these GCS:
- Center of Gravity
- Knee Tracking
- Torso Posture
- Squat Depth


Starting Position: Feet about shoulder width apart, toes pointing 30-45 degrees outward. Dumbbell held in both hands like a goblet with the dumbbell hanging from your palms. Your core is flexed to help support your spine and prevent back injuries and you are breathing normally,not holding your breath. Your back is not arched backward like a banana nor are you curled into a fetal ball – your back is in the neutral position. Most people make the mistake of having their weight too far forward – with their weight resting on the balls of their feet or their toes. Your weight should be as far back toward your heels as you can go without risking falling over backwards – over your mid foot.
Ending Position: OK now slowly go downward with your knees going the direction your feet are pointing. Most people find they need to make a concious effort to drive their knees outward to make this happen. Your knees will end up outside your elbows. Remember to breathe normally as you squat and remember to keep the weight over midfoot – keep the weight OFF the balls of your feet. How far down to go, that depends!
- If you have had knee pain before, stop when your knees are bent 90 degrees – this is called a partial squat.
- If you have never had knee pain and are in good physical shape, go down till your thighs are horizontal and parallel to the ground.
Dumbbell Squats
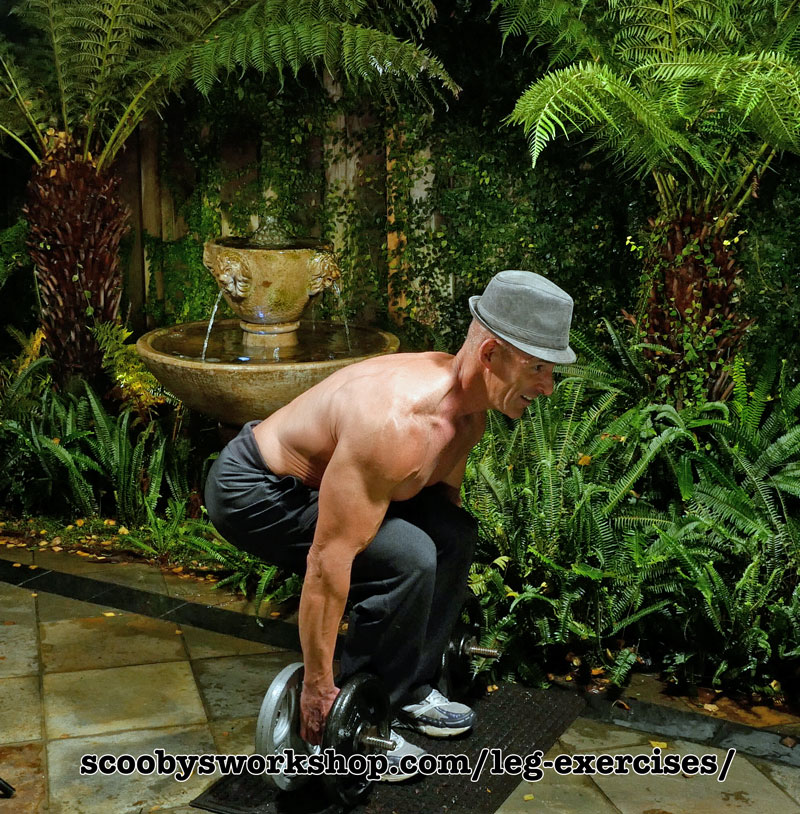

You can call this exercise a dumbbell squat or a dumbbell deadlift because it is kind of both but its probably closer to a squat. The dumbbell squat is a delicious little exercise that you can do at home or at the gym. Not only is it a great quad and hamstring exercise in its own right but its also a great training exercise for doing squats and deadlifts. As I mentioned in my squat and deadlift prep webpage, being able to feel where the weight is on your feet is critical because where your center of gravity (CG) is limits your hip and knee geometry so you have to be able to closely control it. Because this exercise is done with the weights hanging at your side, its perfect for working on CG control. Not only that, but because it uses so many major muscles, you can use it as part of an indoor interval training cardio workout. The dumbbell squat is the best thing since bucket hats!
So lets talk about form first. The #1 most important thing is that you be able to lock in the neutral lower back position. As I mention in the squat and deadlift prep webpage, I strongly suggest that before doing this exercise or any other freeweight leg exercise that you do SDL for at least three months.
Stand with your feet about two fists apart, toes pointing ever so slightly outward. Bend down and grab, but dont lift the dumbbells. Back locked in neutral, chest out and look forward. Feel your center of gravity. Roll onto your toes. roll back onto your heels. Now halfway between the heel and toe – hold that balance point the whole exercise. Now lift upward while focusing on keeping your back in the neutral position. The first half of the lift is all legs – keep your back in the neutral position and at the same angle. Your knees go the direction your foot is pointed. The upper half of the motion is like a SDL, its a hip pivot thats hamstrings and spinal extensors. At the top, lean back. Going slow lets you focus on keeping your center of gravity in the correct position. You dont want to be on your toes, you dont want to be over your heels ready to roll over backwards, you want the weight over your arch – closer to your heel than the ball of your foot. By keeping your CG over your arch, it will force you to move your hips backward rather than your knees forward when you bend down.
The reason I say this exercise is so delicious is that its wonderfully balanced. If your center of gravity is in the right spot then when you are in the down position almost ready to touch the dumbbells to the ground you feel a very balanced pull on your hamstrings and your quads.
So thats it for the dumbbell squat. A delicious little exercise you can do at home or the gym that not only gives a killer hamstring and quad workout but can be used as part of an interval training cardio workout as well!
Split Squats
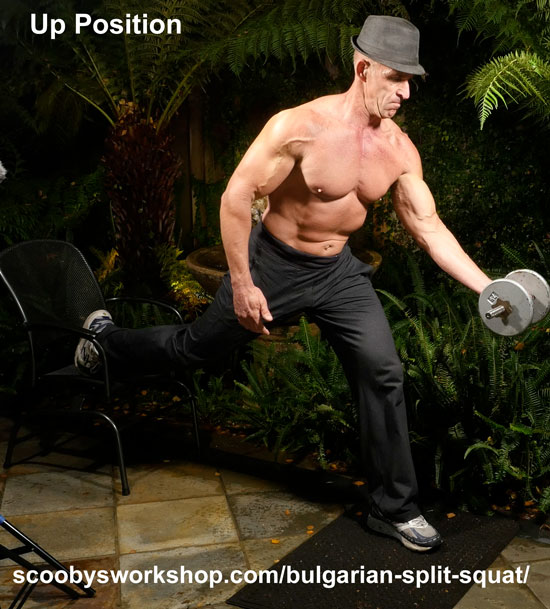
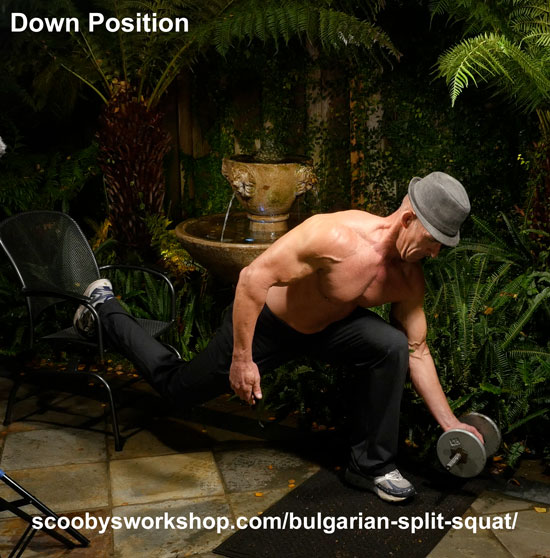
The Scoobystyle Bulgarian Split Squat is a great hamstring, butt, and core exercise you can do at home or at the gym. No, this is NOT how everyone else does Bulgarian Split Squats, its my own variant of this exercise. Why and how is this version of the Bulgarian Split Squat different? Glad you asked. First the “why”. I need knee-friendly leg exercises and this version is more knee-friendly than that traditional Bulgarian Split Squat. Second, I wanted more hamstring and butt action and less quad involvement. Third, as always, I like it when its asymmetrical which works out your core at the same time.
So, now the “how”. How is my version different from the traditional Bulgarian Split Squat.
- First you use only one dumbbell rather than two
- Second, the dumbbell is held out in front of your foot rather than hung at your side
- Third, the torso does not stay vertical the whole movement. As you go down, you bow forward to tap the dumbbell to the ground
- Fourth, the knee stays well behind the toe.
Lunges


The lunge is a great quad and butt exercise. The key is starting with very light weight till you have the coordination of this movement down. Personally, I have to use lifting straps to hold the weights up otherwise I end up dropping them but perhaps you have stronger wrists than I do. I like doing these onto a step stool but you can do them on flat floor also. If you use a step stool, make 100% sure that it will not slide around as this could cause very serious injury. I find putting the step-stool against a wall on a carpet the safest and most secure.
Starting Position: Natural standing stance with the weights hanging from each arm. Now take a big step forward onto the stepstool.
Ending Position: Make sure that your knee does not extend forward of your toes to minimize strain on your knees. Now push off and return to the starting position. Do 6-12 reps of this then switch legs.
Scooby’s Skateboard Squats


Finally a home leg exercise that is as good as any gym machine, this is the mechanical equivelent of a leg press machine. Took me awhile to come up with a safe, effective exercise people can do at home for quads with simple equipment. I have to say, I was pretty pleased with myself for coming up with this. Most home exercises for quads work only work for beginners but these puppies you can really load the weight on! All you need for this great exercise is a skateboard, a used set of dumbbells and a stool. There are very few quad exercises I feel I can safely lift large amounts of weight and this is one of them. I love the burn and even more I love being so incredibly sore the next days that walking is difficult and going down stairs impossible :)
Starting Position: Knees behind the toes, knees bent 90 degrees, lightly touching the stool with your butt. Dumbbells hanging from your hands, use straps if you need to. Skateboard is behind your back. Note, wall must be strong wood or masonry – don’t attempt this indoors with plaster walls as you will destroy the wall.
Ending Position: Roll up slowly and smoothly till your knees are nearly straight, but not locked. Now very slowly slide back down. Don’t thunk on the stool, just barely touch it. The stool is there for safety, not for sitting on :)
Leg Extensions

This is an easy exercise to do at home, its my personal favorite. If you don’t have a multi-purpose bench with a leg attachment, you can build a leg extension setup with just a leather belt, a dumbbell, and a harness.
Starting Position: Very important, don’t go lower than this as its really bad for your knees.
Ending Position: Move the weight slowly and steadily to the horizontal position, try and hold this for a second before lowering again.
Hamstring Dominant Exercises
Scooby Dead Lifts.


First, please read about the difference between a Romanian deadlift and a stiff legged deadlift. For the health of your knees, its important to keep all the leg muscles in balance. Having huge quads and spindly little hamstrings is a recipe for knee problems. It is an advanced exercise and very dangerous if done improperly so I suggest you have a physical therapist (not a personal trainer) show you how to do it properly. I personally love this exercise as it is both a stretch and a strengthening exercise all in one. I know I have said “do this exercise slowly” before, but this time it is absolutely critical for two reasons: first it is a stretch and you have to go down very slowly (2-15seconds) or risk pulling your hamstring muscle, secondly the back is in a vulnerable position and going at a snails pace helps insure that you are using perfect form. First safety point, flex your abs and keep them flexed as hard as steel: this will help support your lower back. Second keep your back neutral, lets talk a minute about what this means because its very important. Neutral means not arched backwards like a swan dive and not curled forward like the fetal position, in fact, if you stand with good posture that is the correct back position.
You are going to keep your entire upper torso completely motionless. Your legs are going to be locked and will stay that way, if you cant go down very far that is fine but just go down as far as you can. If you bend your knees you are no longer exercising your hamstrings. This exercise is traditionally done with the barbell held behind the neck but I view this as very dangerous because if you have a back twinge you cant quickly drop the weight to avoid serious injury. When the weight is lightly hanging from your hands as I recommend, you can let go at the first hint of trouble. Each rep you will go a bit lower as you stretch out but don’t force it, the last thing you want is a pulled hamstring, it should just feel pleasantly tight. After a few months you will find you will be able to go lower and lower and use more and more weight. We will use an opposing grip on the bar, one palm facing forward and one facing backward, and we will not use straps or gloves so that we can drop the bar rapidly should we feel the slightest twinge of pain. OK if I haven’t scared you off yet, here is the exercise. The first few times do this without any plates on the bar at all till you build confidence and then move up in weight very slowly.
Starting Position: Legs locked, arms holding bar with opposing grip, back in neutral position. Sllllooooooooowwwlllyyy, drop down gently feeling the stretch on the way down. Keep your torso fixed, don’t be tempted to droop your shoulders toward the ground in an attempt to look like you are going lower than you really are. Remember to constantly keep the abs flexed to support your back
Middle Position: On the way down, keep the barbell as close to your legs as you can to reduce the pressure on the lower back. Notice the back is still in the neutral position – not rounded like I’m hugging a barrel and not arched back into the ‘swan-dive’ position.
Ending Position. When you have gone as low as you can with your knees locked, start to go back up. Do not be tempted to jerk upwards, arch your back, or any other such maneuver because it will result in injury – use less weight if you feel you have to do any of these things. Do as many reps as you can with perfect form. Again note that my back is in the neutral position.
One Legged Stiff Legged Deadlift
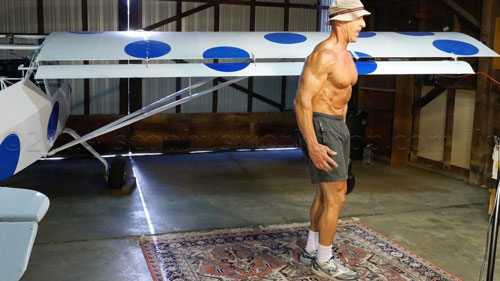
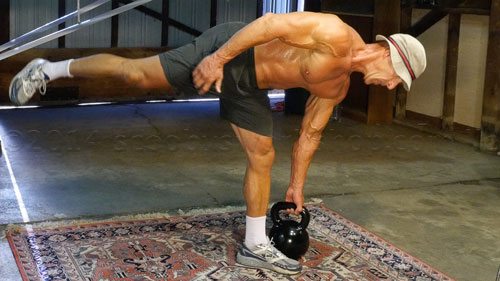
This is an awesome hamstring exercise you can do at home or at the gym. Its a single leg kettlebell stiff legged deadlift for hamstrings. Now I know that some of you think that anything that requires balance is stupid, its not. Yes, working on balance is good but thats not the main reason we are doing this on one leg. Its because doing them one legged turns it into an amazing core workout. Its triple duty, hamstrings, balance, and core – all at once!
In the start position you are standing as straight and upright as you can with your shoulders held back and your chest thrust out. Most or all of your weight is on the foot closest to the kettlebell. The knee is bent slightly and will remain immobile like this the whole time, no bouncing up and down with the leg.
As you go down slowly, the trailing leg is straight and in line with your torso. The chest remains thrust out and the shoulders held back. The torso is held immobile in this neutral position the whole time, no rounding or arching. To balance, remember that your arm holding the kettlebell is the primary balancing tool, don’t try to do all the balancing with your foot.
Go down as far as you can to get a good stretch and hold it at the bottom – feel the stretch. If you are very limber you will have to do this standing on a sturdy footstool or block of wood.
A great core workout! What? “Why is this a core workout” you ask? Try it and you will see! This isn’t a “make sixpack abs to get hot babes” kind of core workout, its more about building the stabilizing muscles that get used in sports and when you trip over the kettlebell you left in the middle of the floor. Any time the torso is loaded asymmetrically, its a core workout. When you do this you will feel your lower back, your obliques, your abs, and everything in-between straining to support that heavy arm with the kettlebell. Most accidents that throw peoples backs out are asymmetrical, twisting kinds of accidents. By strengthening your core slowly and gently with exercises like this, you will better be able to withstand the jarring surprise tackle from behind without injury.
Clearly there is no reason that this exercise has to be done with a kettlebell, you can use a dumbbell. Its just that the handle of a kettlebell is a lot easier to grasp when you get into the larger weights because its diameter is larger.
Calf Raises
This is an easy exercise to do at home, all you need is a set of dumbbells and a bit of wood. In doing the calf raises form is very important, only use the weight that you can move slowly full the full range of motion.To do calf raises you need a place to do them. You can make a simple stand with 2×4’s glue and nails. Make sure it is rock solid because if it is not you will get injured. The below video shows you how to make this stand as well as how to perform the exercise.
Starting Position: The ball of your foot is over the edge of the calf raise stand. The heel as low as you can comfortably go, a slight stretch is good but don’t overdo it. If you have built your calf raise stand correctly, your heel will touch the floor when you do this comfortable stretch and will prevent you from over-stretching and possibly injuring your Achilles.
Ending Position: Slowly and smoothly raise the heel as high as you can.

